Pioneer Woman Apple Crisp: The Incredible Ultimate Recipe
Pioneer Woman Apple Crisp is an amazing dessert that brings the cozy flavors of fall to your kitchen. If you’ve never tasted warm, baked apples topped with a crunchy, buttery oat crumble, you’re in for a treat. This recipe is not only delicious but also simple to prepare, making it perfect for both novice and experienced bakers alike. The aroma of cinnamon and caramelized sugar wafting through your home while this dessert bakes is simply irresistible.
Imagine a delightful combination of sweet, tender apples enveloped in a golden, crunchy topping. Each spoonful delivers a contrast of textures and flavors that will have everyone reaching for seconds. This beloved dish can serve as a stand-alone dessert or be paired with a scoop of vanilla ice cream for an extra special treat. As the crisp bakes, you may even find yourself reminiscing about family gatherings and warm evenings spent around the dinner table.
In this guide, we’ll explore the reason you’ll love this Pioneer Woman Apple Crisp recipe, how long it takes to prepare and cook, and provide an easy-to-follow ingredient list and step-by-step instructions. Get ready to impress your loved ones with this incredible dessert that’s sure to become a new favorite in your home!
Why You’ll Love This Recipe
Pioneer Woman Apple Crisp is everything you could want in a dessert. Here are some compelling reasons why this recipe will surely win your heart:
1. Simple to Make: Using straightforward ingredients, this recipe is perfect for bakers at any skill level.
2. Comfort Food at Its Best: The warm, spiced apples combined with the crunchy topping create a comforting flavor profile that’s perfect for cozy evenings.
3. Seasonal Appeal: This recipe shines in the fall but can be enjoyed year-round, thanks to easily available apples.
4. Versatile Recipe: Feel free to customize it with different types of fruit or add-ins like nuts or dried cranberries.
5. Easy Cleanup: With minimal equipment required, spending less time cleaning means more time enjoying your delicious creation!
6. Crowd-Pleaser: Whether serving at a family gathering or a cozy dinner with friends, everyone will appreciate this delightful dessert.
With these enticing features, it’s no wonder that Pioneer Woman Apple Crisp has gained such popularity. Step into your kitchen, and let’s embark on a culinary adventure together!
Preparation and Cooking Time
Preparing Pioneer Woman Apple Crisp is relatively quick and straightforward. Here’s a breakdown of the time required:
– Preparation Time: 15 minutes
– Cooking Time: 30-35 minutes
– Total Time: Approximately 50 minutes
This timeline allows for a quick turnaround, ensuring you can have a freshly baked dessert in no time. Your guests (or family!) won’t have long to wait before indulging in this delicious treat.
Ingredients
– 6 cups sliced apples (preferably Granny Smith or Honeycrisp)
– 1 tablespoon lemon juice
– 1 cup granulated sugar
– 1 teaspoon ground cinnamon
– 1 cup rolled oats
– 1 cup all-purpose flour
– ½ cup packed brown sugar
– ½ teaspoon salt
– ½ cup unsalted butter, melted
– 1 teaspoon vanilla extract
Step-by-Step Instructions
Creating Pioneer Woman Apple Crisp is a breeze when you follow these simple steps:
1. Preheat the Oven: Begin by preheating your oven to 350°F (175°C).
2. Prepare the Apples: Peel, core, and slice the apples into thin wedges. Place them in a large mixing bowl.
3. Add Lemon Juice: Drizzle the lemon juice over the sliced apples to prevent browning and enhance flavor.
4. Mix Sugar and Cinnamon: In a separate small bowl, combine the granulated sugar and ground cinnamon. Sprinkle this mixture over the apples and toss to coat evenly.
5. Prepare the Topping: In another bowl, mix together the rolled oats, all-purpose flour, brown sugar, and salt.
6. Add Butter: Pour the melted butter and vanilla extract into the oat mixture. Stir until everything is well combined and crumbly.
7. Assemble: In a greased baking dish, layer the spiced apple mixture evenly. Then, sprinkle the oat topping over the apples to cover completely.
8. Bake: Place the dish in the preheated oven and bake for 30-35 minutes, or until the apples are tender and the topping is golden brown.
9. Cool Slightly: Once done, remove it from the oven and let it cool for a few minutes before serving.
This straightforward process guarantees that you’ll create a delightful dessert everyone will love!
How to Serve
When it comes to serving your Pioneer Woman Apple Crisp, presentation and accompaniment can enhance the experience:
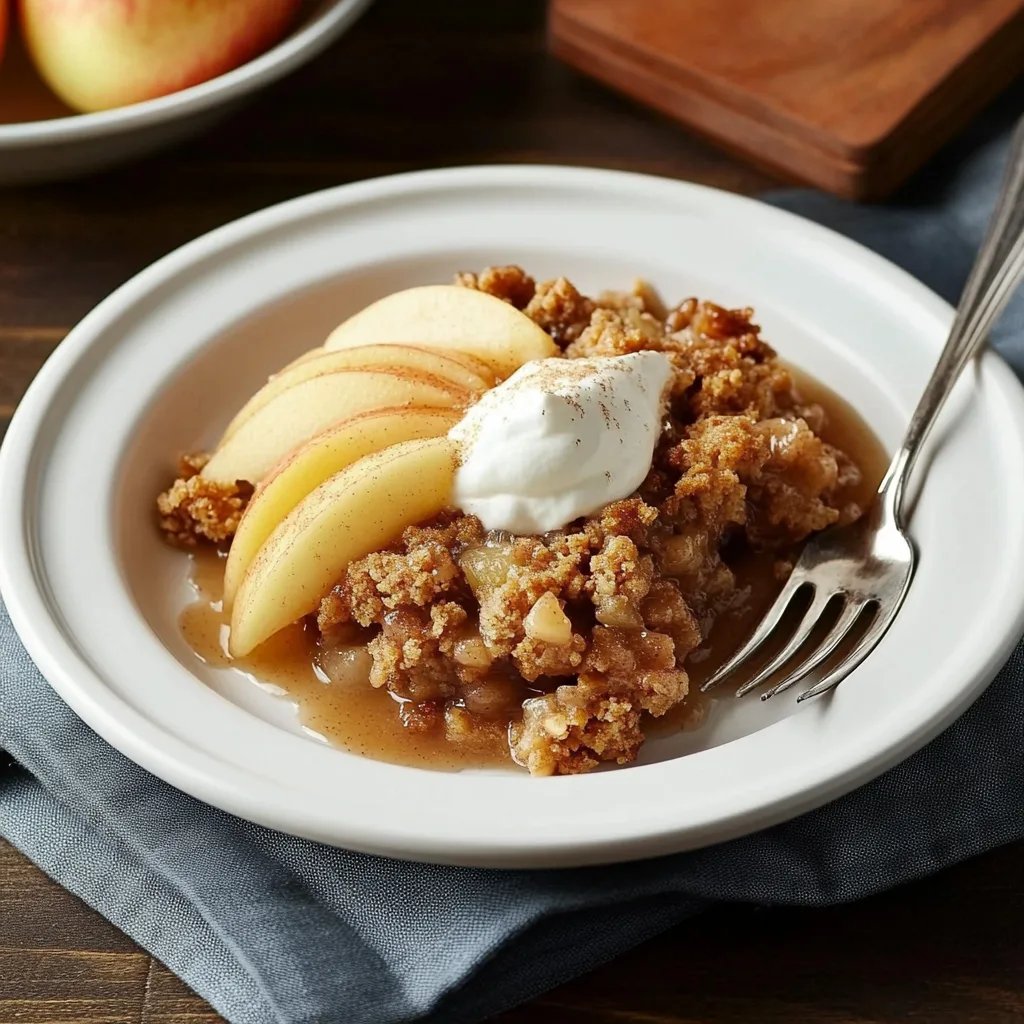
1. Presentation: Serve the apple crisp warm in individual bowls or on a sharing platter.
2. Accompaniments: Enhance the dish with a scoop of vanilla ice cream, whipped cream, or even a dollop of yogurt for a tangy contrast.
3. Garnish: Consider adding a sprinkle of cinnamon or chopped nuts to elevate appearance and flavor.
4. Pairing Drinks: Apple crisp pairs wonderfully with warm cider, coffee, or even a dessert wine, making it an excellent choice for gatherings.
5. Leftovers: If there are any leftovers, store them in an airtight container in the refrigerator. Reheat in the oven or microwave for a quick treat.
With these serving tips, your Pioneer Woman Apple Crisp will not only taste amazing but will also look stunning on the table! Enjoy this incredible dessert and share the joy it brings to every gathering!
Additional Tips
– Use Fresh Apples: Selecting the right apples is crucial. Opt for a mix of tart and sweet varieties for the best flavor balance.
– Experiment with Spices: In addition to cinnamon, you can add nutmeg or allspice for a more complex flavor profile.
– Serve Warm: Apple crisp is most enjoyable when served warm right out of the oven. The contrast with cold ice cream is heavenly.
– Enhance with Toppings: Consider drizzling caramel sauce over the crisp for extra sweetness and richness.
Recipe Variation
There are many delightful ways to modify the basic Pioneer Woman Apple Crisp recipe. Here are some tasty variations:
1. Mixed Fruit Crisp: Combine apples with other fruits like berries or peaches for a unique flavor.
2. Nutty Topping: Add chopped pecans or walnuts to the oat mixture for a crunchy texture.
3. Gluten-Free Option: Substitute all-purpose flour with gluten-free flour blend to cater to dietary needs.
4. Oat-Free Version: For a lighter option, skip the oats entirely and increase the flour slightly for a different topping.
Freezing and Storage
– Storage: To keep your apple crisp fresh, cover it tightly and refrigerate. It should last up to 3 days.
– Freezing: Apple crisp can be frozen for up to 3 months. Wrap it tightly in plastic wrap and aluminum foil to avoid freezer burn. When ready to eat, bake from frozen until heated through.
Special Equipment
Having the right tools can make the process of preparing your apple crisp even easier. Here are the essentials:
– Sharp Knife: To easily slice the apples.
– Mixing Bowls: For combining all the ingredients.
– Baking Dish: A 9×13 inch dish is perfect for this recipe.
– Measuring Cups and Spoons: To ensure precise measurements for the ingredients.
– Peeler: For quick peeling of apples.
Frequently Asked Questions
Can I use pre-sliced apples for the recipe?
Yes, pre-sliced apples can be used, but make sure they are fresh and offer a good balance of flavors.
How can I tell when my apple crisp is done?
Look for bubbling around the edges and a golden-brown topping. The apples should be tender when pierced with a fork.
Can I double the recipe?
Absolutely! If you’re serving a large group, doubling the recipe is a great idea. Just use a larger baking dish to accommodate the extra ingredients.
How long can I keep leftovers?
Leftover apple crisp can be refrigerated for up to 3 days. For longer storage, consider freezing it.
Is it possible to make it vegan?
Yes, you can replace the butter with coconut oil or vegan butter and use maple syrup instead of granulated sugar.
Conclusion
Pioneer Woman Apple Crisp is a timeless dessert that combines the warmth of baked apples with the delightful crunch of a buttery oat topping. Its simplicity and comforting flavors make it a favorite among many. This recipe is not just a dish; it’s an experience that can bring family and friends together, creating memories around the table. Whether enjoyed alone or with a scoop of ice cream, this dessert is bound to become a household staple.